- Published on
ESXi & vSAN & VCF Automation
- Authors
- Name
- Jackson Chen
Adding Drivers into VMWare ESXi Installation Image
http://woshub.com/add-drivers-vmware-esxi-iso-image/
VMware ESXi 7 Boot Options
https://4sysops.com/archives/vmware-esxi-7-boot-options/
- Boot from PXE
Configure ESXi Unattended Installations
https://www.altaro.com/vmware/scripted-deployment-esxi-part-1/
Steps for setting up ESXi installations
- Unattended Network Install
. Create kickstart file
. Save kickstart file to NFS server or Web Server
. Edit vSphere ISO to look for kickstart file
. Boot to ISO and watch install complete
- Unattended No Network Install
. Create kickstart file
. Edit vSphere ISO to look for kickstart file and place kickstart file on ISO
. Boot to ISO and watch install complete
A kickstart file is a text file containing the configuration typically used for Linux installations. ESXi is NOT based on Linux it does not use the Linux kernel, it uses its own proprietary VMkernel, however, there are many similarities to Linux and Unix-like OSes and being able to use kickstart files for configuring installs is one of them. The kickstart file has a “.CFG” extension and is very easy to read and configure once you learn the formatting.
# Example of cfg with 4 port network uplinks
# File Name: esx-config.cfg

#Accept the VMware End User License Agreement
vmaccepteula

# clear paritions and install
clearpart --firstdisk --overwritevmfs
install --firstdisk --overwritevmfs

#set the root password
rootpw --iscrypted $1$RYrDe0s7$saHQ6deVkNW8mQn8bgGDT1

#Host Network Settings
network --bootproto=static --addvmportgroup=1 --ip=192.168.0.10 --netmask=255.255.255.0 --gateway=192.168.0.1 --nameserver=192.168.0.1 --hostname=ESXHOST1


reboot

#Firstboot section 1
%firstboot --interpreter=busybox
sleep 30

#Enter Maintenance mode
vim-cmd hostsvc/maintenance_mode_enter

#suppress Shell Warning
esxcli system settings advanced set -o /UserVars/SuppressShellWarning -i 1
esxcli system settings advanced set -o /UserVars/ESXiShellTimeOut -i 1

#Add DNS Nameservers to /etc/resolv.conf
cat > /etc/resolv.conf << \DNS
nameserver 192.168.0.1
nameserver 192.168.0.2
DNS

#VSwitch Configurations
esxcli network vswitch standard add --vswitch-name=vSwitch0 --ports=24
esxcli network vswitch standard uplink add --uplink-name=vmnic0 --vswitch-name=vSwitch0
esxcli network vswitch standard uplink add --uplink-name=vmnic1 --vswitch-name=vSwitch0
esxcli network vswitch standard uplink add --uplink-name=vmnic2 --vswitch-name=vSwitch0
esxcli network vswitch standard uplink add --uplink-name=vmnic3 --vswitch-name=vSwitch0
esxcli network vswitch standard policy failover set --active-uplinks=vmnic0,vmnic1,vmnic2,vmnic3 --vswitch-name=vSwitch0
esxcli network vswitch standard portgroup policy failover set --portgroup-name="Management Network" --active-uplinks=vmnic0,vmnic1,vmnic2,vmnic3
esxcli network vswitch standard portgroup add --portgroup-name=ESXHOST1-prod0 --vswitch-name=vSwitch0
esxcli network vswitch standard portgroup remove --portgroup-name="VM Network" --vswitch-name=vSwitch0

#Firstboot Section 2
%firstboot --interpreter=busybox

#Disable IPv6
esxcli network ip set --ipv6-enabled=false

#Reboot
sleep 30
reboot
Performing an unattended installation VMware ESXi
https://www.linkedin.com/pulse/deploying-vmware-esxi-part-2-dara-hakak-rad/
ESXi supports the use of an installation script( often referred to as a kickstart, or KS, script ) that automate the installation routine. By using an installation script, users can create unattended installation routines that make it easy to quickly deploy multiple instance of ESXi.
ESXi comes with a default installation script on the installation media, The default installation script is useful only if the setting work for your environment.
#
# Sample scripted installation file
#

# Accept the VMware End User License Agreement
vmaccepteula

# Set the root password for the DCUI and Tech Support Mode
rootpw mypassword

# Install on the first local disk available on machine
install --firstdisk --overwritevmfs

# Set the network to DHCP on the first network adapter
network --bootproto=dhcp --device=vmnic0

# A sample post-install script
%post --interpreter=python --ignorefailure=true
import time
stampFile = open('/finished.stamp', mode='w')
stampFile.write( time.asctime() )
If you want to use this default install script to install ESXi, you can specify it when booting the VMware ESXi by adding:
ks=file://etc/vmware/weasel/ks.cfg boot option
Some the commands are
accepeteula OR vmaccepteula
    these commands accept the ESXi license agreement.

install
    this command specifies that this is a fresh installation of ESXi, not an upgrade.
    You must also specify the following parameters:

-firstdisk
    Specifies the disk on which ESXi should be installed. By default, the ESXi installer chooses local disks first, then remote disks, and then USB disks.
    You can change the order by appending a comma separated list to the -firstdisk command :
        -firstdisk=remote,local

    This would install to the first available remote disk and then to the first available local disk.
    Be careful here you don't want to inadvertently overwrite something.

-overwitevmfs OR -preservevmfs
    these commands specify how the installer will handle existing VMFS datastores.

keyboard
    this command specifies the keyboard type. it is an optional component in the installation script.

Network
    this command provides the network configuration for the ESXi host being installed.
    it is optional but generally recommended.
    Depending on your configuration , some additional parameters are required:

-bootproto
    this parameter is set to dhcp for assigning a network address via DHCP ,
    or to static for manual assignment of an IP address.

-ip
    sets the IP address ,
    and is required with -bootproto=static the IP address should be specified in standard format.

-gateway
    this command specifies the IP address of the default gateway in standard format.
    it's required if you specified -bootproto=static

-netmask
    the network mask, in standard format.is specified with this command.
    If you specify -bootproto=static, you must include this value.

-hostname
    specifies the hostname for the installed system.

-vlanid
    if you need the system to use a VLAN ID, specify it with this command.
    Without a VLAN ID specified, the system will respond only to untagged traffic.

-addvmportgroup
    this parameter is set to either 0 or 1 and controls whether a default VM Network port group is created.
    0 does not create a port group;
    1 does create the port group.

Reboot
    this command is optional and, if specified, will automatically reboot the system at the end of installation.
    if you add the -noeject parameter, the CD is not ejected.

Rootpw
    this is a required parameter and sets the root password for the system.
    If you don't want the root password displayed in the clear,
    generate and encrypted password and use the -iscrypred parameter.

Upgrade
    this specifies to upgrade to ESXi X.
    The upgrade command use the many of the same parameters as install ,
    and also supports a parameter for deleting the ESX service Console VMDK for upgrades from ESX to ESXi.
    This parameter is the -deletecosvmdk parameter.
Once you have created the installation script you will use, you need to specify that script as part part of routine installation.
Specifying the location of the installation script as a boot option is not only how you would tell the installer to use the default script but also how you tell the installer to use a custom installation script that you've created. This installation script can be located on a USB flash drive or in a network location accessible via NFS, HTTP, HTTPS, or FTP.
Some of the supported boot options for use with an unattended installation of ESXi :
ks=cdrom:/path
    Use the installation script found at path on the CD-ROM.
    The installer checks all CD-ROM drives until the file matching the specified path in found.
ks=usb
    Uses the installation script name ks.cfg found in the root directory of an USB device.
    All USB devices are searched as long as thay have a FAT16 or FAT32 file system.
ks=usb:/path
    Uses the installation script at the specified path on an attached USB device.
    This allows you to use a different filename or location for the installation script.
ks=prtocol:/serverpath
    Uses the installation script found at the specified network location.
    The protocoal can be NFS, HTTP, HTTPS or FTP.
ip=XXX.XXX.XXX.XXX
    Specifies a static IP address for downloading the installation script and the installation media.
nameserver=XXX.XXX.XXX.XXX
    Provides the IP address of a DNS server to use for name resolution when downloading the installation script or the installation media.
gateway=XXX.XXX.XXX.XXX
    Provides the network gateway to be used as the default gateway foe downloading the installation script and installation media.
netmask=XXX.XXX.XXX.XXX
    Specifies the network mask for the network interface use to download the installation script or installation media.
vlanid=X
    Configures the network interface to be on the specified VLAN when downloading the installation script or media.
These are the most commonly options for more options check vSphere installation document
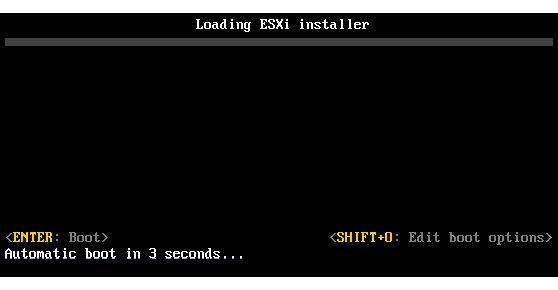
To use one or more of these boot options during the installation, you'll need to specify them at the boot screen for the ESXi installer. the bottom of the installer boot screen states that you can press Shift+O to edit the boot options.
The following code line is an example that could be used to retrieve the installation script from an HTTP URL; this would be entered at the prompt at the bottom of the installer boot screen:
<ENTER: Apply options and boot> <ESC : Cancel>

>runwaesel ks=https://x.x.x.x/path/ks.cfg ip=x.x.x.x netmask=x.x.x.x gateway=x.x.x.x
Using an installation script to install ESXi not only speeds up the installation process but also helps to ensure the consistent configuration of all your ESXi hosts.
vmaccepteula

# The root password for the deployed image. If changed be sure to update
# the vcenter script below.
rootpw password123!

install --firstdisk

# Sets VMware ESXi licensing key. If not included installs in
# evaluation mode.
# serialnum --esx=XXXXX-XXXXX-XXXXX-XXXXX-XXXXX

network --bootproto=dhcp

%post --interpreter=busybox
# The install reboots by default, when creating an image halt so Packer can
# run post-processors and finish.
halt

%firstboot --interpreter=busybox
# Log all output.
exec &> /var/log/maas.log

# Allow script to continue even if something fails to get as much configuration
# done as possible.
set +e

# Enable SSH
vim-cmd hostsvc/enable_ssh
vim-cmd hostsvc/start_ssh

# Enable ESXi shell
vim-cmd hostsvc/enable_esx_shell
vim-cmd hostsvc/start_esx_shell

# Track whether any network configuration failed.
failed=0

# Apply network configuration
/altbootbank/maas/netplan-esxi -c /altbootbank/maas/curtin.cfg apply || failed=1

# Apply the storage configuration
/altbootbank/maas/storage-esxi -c /altbootbank/maas/curtin.cfg || failed=1

# Temporarily disable firewall so we can communicate with MAAS
esxcli network firewall set --enabled=false || failed=1

MAAS_MD_GET="/altbootbank/maas/maas-md-get -c /altbootbank/maas/curtin.cfg"

# Copy SSH keys from MAAS
$MAAS_MD_GET latest/meta-data/public-keys >> /etc/ssh/keys-root/authorized_keys || failed=1

# Get the FQDN for the machine from MAAS and set it.
esxcli system hostname set --fqdn=$($MAAS_MD_GET latest/meta-data/local-hostname) || failed=1

$MAAS_MD_GET latest/meta-data/vendor-data | /altbootbank/maas/vendor-data-esxi || failed=1

# Tell MAAS deployment has finished by retrieving user-data. user-data is executed if it
# uses an interrupter found on the system(/bin/sh, /usr/bin/env python,
# or /usr/bin/env python3)
$MAAS_MD_GET latest/user-data > /altbootbank/maas/user-data || failed=1
chmod +x /altbootbank/maas/user-data || failed=1
/altbootbank/maas/user-data || failed=1

# Try to join vCenter first using the FQDN then iterating over IP addresses.
for addr in \
        $(hostname) \
    $(esxcli network ip interface ipv4 address list | awk '/vmk/ { print($2) }') \
    $(esxcli network ip interface ipv6 address list | awk '/vmk/ { print($2) }'); do
    # If defined as a global configuration option MAAS and deployed by an administrator
    # MAAS will send the vCenter server, username, password, and datastore which will be
    # stored in vcenter.yaml. You can define these options here if you don't want them
    # stored in MAAS however vcenter.yaml will override any option here.
    /altbootbank/maas/vcenter \
        --config=/altbootbank/maas/vcenter.yaml \
    --datacenter=Datacenter \
    --host=$addr \
    --esxi-username=root \
    --esxi-password='password123!'
        # --server=vCenter FQDN or IP \
    # --username='administrator@vsphere.local' \
    # --password='Password123!' \

    # If registration succeeds or not enough information was given to join
    # vCenter stop trying.
    if [ $? -eq 0 -o $? -eq 64 ]; then
        break
    fi
done

# Reenable firewall
esxcli network firewall set --enabled=true || failed=1

# Cleanup MAAS first boot files.
if [ $failed -eq 0 ]; then
    rm -rf /altbootbank/maas
fi
Install ESXi hosts with custom settings
http://elatov.github.io/2013/01/vcap5-dca-objective-9-1-install-esxi-hosts-with-custom-settings/
- Scripted ESXi 7 installation https://docs.vmware.com/en/VMware-vSphere/7.0/com.vmware.esxi.install.doc/GUID-341A83E4-2A6C-4FB9-BE30-F1E19D12947F.html
Enter Boot Options to Start an Installation or Upgrade Script
# Procedure
1. Start the host.
2. When the ESXi installer window appears, press Shift+O to edit boot options.
3. At the runweasel command prompt, type ks=location of installation script plus boot command-line options.
# Example
ks=http://00.00.00.00/kickstart/ks-osdc-pdp101.cfg nameserver=00.00.0.0 ip=00.00.00.000 netmask=255.255.255.0 gateway=00.00.00.000
Sample DHCP Configurations
Only supported commands can be used in the installation script. This script can be modified to specify settings that need to be unique for each host. The installation script can be stored on an FTP server, an HTTP or HTTPS server, an NFS server, or a USB flash drive.
To start the installation script, enter boot options at the ESXi installer boot command line. At boot time, press Shift+O in the boot loader, enter boot options, and access the kickstart file.
If you are using a PXE boot to install, options can be passed through the kernelopts line of the boot.cfg file. The location of the installation script is set with the ks=filepath option, where filepath is the location of the kickstart file. If ks=filepath is not included in the script, the text installer is executed.
For example, at the runweasel command prompt, you could enter ks= along with the path to the installation script and the command-line options. You could enter the following options to boot the host from a script named esxi-script residing on the server 192.168.1010.10 and set the IP address of the host to 192.168.100.101:
ks=http://192.168.100.10/kickstart/esxi-script.cfg
nameserver=192.168.1.100 ip=192.168.100.101
netmask=255.255.255.0 gateway=192.168.100.101
Check the documentation to see all the different options. There is a default installation script included with the ESXi installer that can be used to install ESXi onto the first disk that is detected.
Install ESXi hosts with custom settings
http://elatov.github.io/2013/01/vcap5-dca-objective-9-1-install-esxi-hosts-with-custom-settings/
Automated ESXi Installation - Inject Kickstart File to ESXi ISO
VMware ESXi Installation can be automated by leveraging kickstart configurations. The kickstart configuration is a simple script that tells the Installer how to Install and configure ESXi.
A Kickstart configuration is commonly used for PXE boot installations and copied from the network.
# Prerequisites
. Linux system (or WSL) with root permissions and the genisoimage package.
. ESXi Installer ISO (Download from vmware.com)
. esxi_ks_injector scripts from my GitHub Repository
. Kickstart Configuration File (Examples are provided with the esxi_ks_injector repo)

# Inject Static Kickstart Configuration to ESXi ISO
You have a static Kickstart Configuration and ESXi ISO and just inject the configuration to the ISO.
- Using Auto Deploy VMware vSphere Auto Deploy makes it possible to install ESXi 7 on hundreds of physical hosts. By using Auto Deploy, experienced administrators can manage large environments efficiently. However, your vCenter server needs to be up; otherwise, Auto Deploy does not work.
ESXi 7 hosts use network booting to boot from a central Auto Deploy server. Hosts can be configured with a host profile created from a reference host. This host profile can be created to prompt for input. After the hosts boot and are configured, they are managed by vCenter Server, as other ESXi hosts are.